KNX is an open standard for building automation. KNX is the standard name for the formerly known EIB communication protocol. KNX devices interact with the building by turning on/off lights, shutting windows blinds, heating and air conditioning control, security devices, and several other features depending on the type of devices installed. KNX serves as a robust, reliable, and future-proof standard for building automation, encompassing a broad spectrum of devices and applications. By empowering buildings with KNX technology, occupants can experience heightened comfort, energy efficiency, and security, while building owners and facility managers benefit from optimized operations and resource utilization. As KNX continues to evolve and integrate with emerging technologies, its prominence in the building automation domain is set to endure, playing a pivotal role in shaping smart and sustainable buildings of the future.
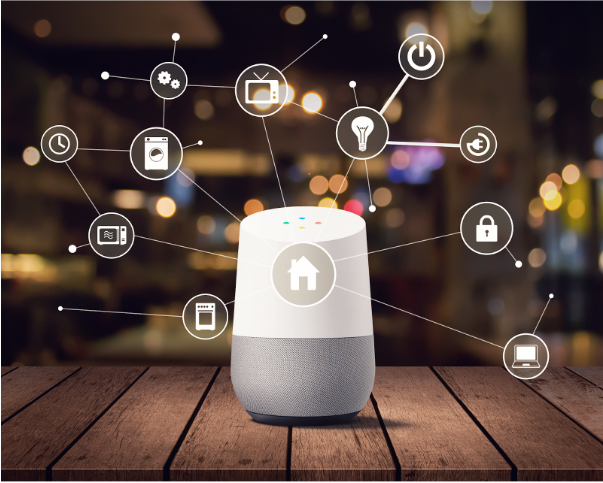
Figure 1: Home automation for connected devices
mikemacmarketing, CC BY 2.0, via Wikimedia Commons
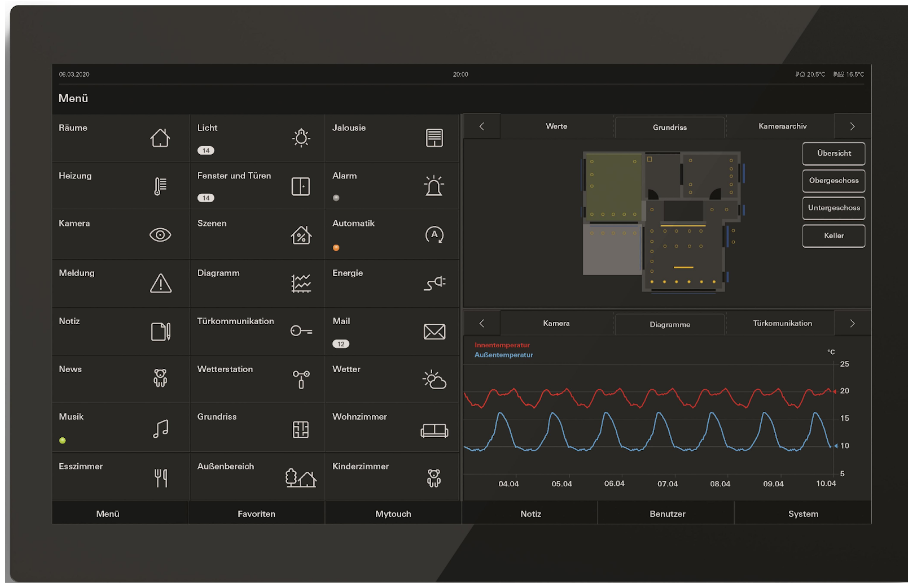
Figure 2: Control panel Gira Smarthus KNX.
Gira Media, CC BY 2.0, via Gira Media
KNX is a bus system
The KNX network is a bus consisting of sensors, actuators, and controllers. Sensors send information to the bus, while actuators act on such information. Controllers may read information from the bus (sensors) and act on a device (actuator) executing a determined function, for instance, a timer. There may exist interfaces with other systems like gateways, including EIBnet/IP, DMX controllers, etc.
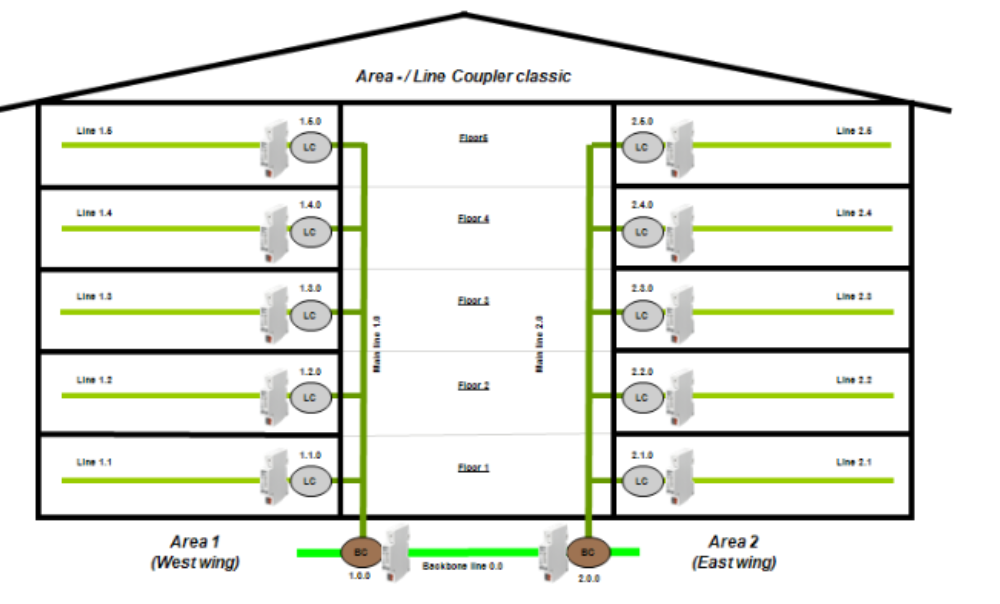
Figure 3: Bus lines in a building.
KNX TP1 Topology. KNX Association
As seen, each floor in a specific area has its own bus line, joined together for each area with line couplers and joined each area with bus couplers. This altogether, and the devices, create the bus system.
KNX media types
KNX network buses support interconnecting several different media types.
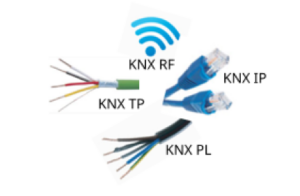
Figure 4: KNX network and the different media types.
Supported media types for KNX are:
- Twisted Pair (KNX TP): Bus is a data cable using 24V power supply
- Powerline (KNX PL): Bus uses main 230V power network
- Radio Frequency (KNX RF): via radio signals
- IP (KNX IP): via Ethernet
The first media type for KNX was Twisted Pair (KNX TP) cable. This is the original format for the KNX protocol. Other supported media have adaptations to the original format adding some headers to the primary protocol.
KNX Topology
KNX TP buses may consist of several lines of the bus. Each line of the bus may be split into 4 segments. Each segment has a power supply unit, and usually no more than 64 devices. The KNX TP cable performs two functions: supply the line bus with power and transmit data (telegrams). Bus lines are interconnected with line couplers that may work like a router, e.g: will not send telegrams to lines for which is not destined (filtering). Each line coupler can operate on up to 15 bus lines.
Different topologies may coexist on the same network interconnected by appropriate couplers. The following image shows all the different types of topology interconnected in a KNX network.
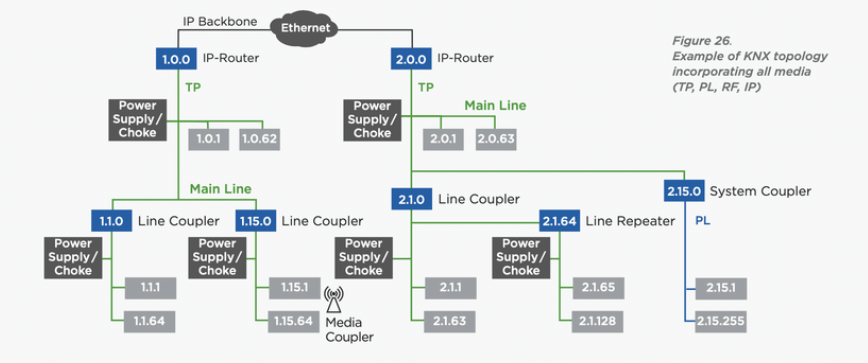
Figure 5: Example of complete KNX topology.
SVSHI: Secure and Verified Smart Home Infrastructure - Scientific Figure on ResearchGate
KNX addresses
KNX uses two different address modes: physical address and group addresses. Both must be configured for the devices to work properly. Physical addresses are unique per device and identify each device on the bus. Group addresses are addresses used in the bus to send and receive messages from connected devices.
Physical addresses
The properties of physical addressing are the following: the address must be unique in the network and line couplers are always device number 0 on the line.
The address consists of 3 numbers separated by dots and can be normally ordered by the following use case/format:
- Area number
- Line number
- Device number
For example, a line coupler can have the address of 1.1.0, and a device in that line has the address of 1.1.10.
Group addresses
Group addresses are 16-bit numbers where the 0 is reserved for broadcast. The group addresses are the addresses to listen for or send telegrams to (send to/receive from). Multiple devices can share group addresses in configurations.
The addressing can be split into three addressing modes: three-level, two-level, and one-level. The most common is a three-level addressing.
The following table tries to summarize the addressing space and the three addressing modes.
| Mode | From..To | Min / Max Address | |||
| Three-level | 0..31 | 0..7 | 0..255 |
0.0.1 |
31.7.255 |
| Two-level | 0..31 | 0..2047 |
0.1 |
31.2047 |
|
| One-level | 0..65535 |
1 |
65535 |
||
Regarding this table we can observe the following:
Three-level addressing
Consists of 3 numbers separated by / (Ex: 1/0/1).
Normally divided into:
- Area (Exterior/Main Floor/Floor 0/etc) from 0..31
- Type (lights/blinds/heating/etc) from 0..7
- Device Number of the group from 0..255
0/0/0 is reserved for broadcast.
Two-level addressing
Consists of 2 numbers separated by / (Ex: 1/2000).
Normally divided in:
- Main from 0..31
- Sublevel from 0..2047
0/0 is reserved for broadcast.
One-level addressing
One-level domain is only a 16-bit number from 0..65535.
0 is reserved for broadcast
KNX object flags and datatypes
Each device has several objects. Each object may represent the light intensity or shutter position or a single bit on/off. Each object has its properties set with several flags representing the permissions of that object in the device.
There are 6 different object flags defined in the protocol.
|
Flag |
Meaning | Description |
|
C |
Communication flag | All flags are enabled |
|
R |
Read flag | The device will reply to read operations from the bus |
|
T |
Transmit flag | The device will send the updated value |
|
W |
Write flag | The device will read from the bus and set to its value. |
|
U |
Update flag | The device will query and update according to a response from the bus. |
|
I |
Initialization flag | The device will query on reset and obtain a response on the bus. If it has a W flag it will update the value afterwards. |
There are several data types defined but the most often used types are:
| Code | Description |
| 1.yyy | boolean, like switching, move up/down, step |
| 2.yyy | 2 x boolean, e.g. switching + priority control |
| 3.yyy | boolean + 3-bit unsigned value, e.g. dimming up/down |
| 4.yyy | character (8-bit) |
| 5.yyy | 8-bit unsigned value, like dim value (0..100%), blinds position (0..100%) |
| 6.yyy | 8-bit 2’s complement, e.g. % |
| 7.yyy | 2 x 8-bit unsigned value, i.e. pulse counter |
| 8.yyy | 2 x 8-bit 2’s complement, e.g. % |
| 9.yyy | 16-bit float, e.g. temperature |
| 10.yyy | time |
| 11.yyy | date |
| 12.yyy | 4 x 8-bit unsigned value, i.e. pulse counter |
| 13.yyy | 4 x 8-bit 2’s complement, i.e. pulse counter |
| 14.yyy | 32-bit float, e.g. temperature |
| 15.yyy | access control |
| 16.yyy | string -> 14 characters (14 x 8-bit) |
| 17.yyy | scene number |
| 18.yyy | scene control |
| 19.yyy | time + data |
| 20.yyy | 8-bit enumeration, e.g. HVAC mode (‘auto’, ‘comfort’, ‘standby’, ‘economy’, ‘protection’) |
Commissioning of devices on the KNX bus
All devices in the KNX network must be commissioned/configured to work as intended. The configuration must set a physical address on the device, configure the firmware properties and configure the channels and their group addresses (application). To commission a device you must enter in programming mode on the device, depending on the device it may be needed (or not) to physically press a button on the device.
An example with two devices configured is shown:
Switch button sensor | Physical address set to 1.1.10
Channel 1 (On/Off) set to group address 0/0/10 flag T (Transmit)
Light actuator | Physical address set to 1.1.15
Channel 1 (On/Off) set to group address 0/0/10 flag W (Write)
Channel 2 (On/Off) set to group address 0/0/10 flag W (Write)
Description: when the button is pressed it switches the value of the sensor and will send a message to group address 0/0/10. The light actuator is listening for that group address in two lights (channels 1 and 2) that will activate or deactivate according to the received message.
Connecting to the KNX bus
There are several interfaces to connect external devices to the KNX bus. The most common are using the following interfaces to expose the KNX bus:
- BCU2 (FT1.2) serial interface (RS232)
- Old serial (locally attached) interface communication to the KNX bus
- EIBlib/IP (default ports: 50000/tcp, 50001/tcp, 50002/tcp)
- Old KNX remote interface protocol (gateway)
- EIBNet/IP (default ports: 3671/udp)
- The new KNX remote interface protocol (gateway/routing)

Figure 6: Examples of devices for remote KNX communication.
Pictures from several stores online
Scanning KNX bus for device discovery and info retrieval
Devices on KNX buses can be discovered using scan techniques (line scans). This type of scan is made of pings for each address in a bus line and detecting the ones who reply.
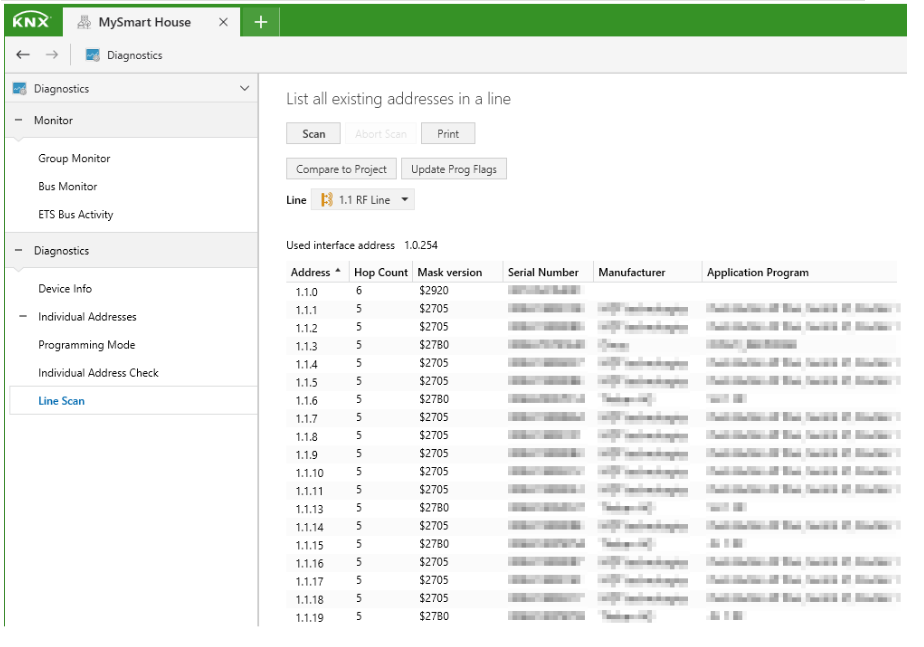
Figure 7: Example of KNX line scan.
KNX documentation: Individual address
After discovering the device’s physical address, one can retrieve its configuration (and group addresses), or write to the devices.
An attack tool that can be used for these and more tasks on KNX devices is knxmap which can be found at (https://github.com/takeshixx/knxmap).
KNX network attacks
On KNX RF, impersonating the serial_number/domain_address of a paired dongle enables an attacker to send arbitrary KNX commands to the bus if S-Mode is used. This can be mitigated by using E-Mode, forcing the remote controller to use configured group addresses per “channel”, but still those group addresses are affected. This can be mitigated by implementing routing restrictions in KNX couplers. Using Zigbee, Bluetooth or other alternatives to simple RF remote controllers enable encryption and better pairing methods. You will need a proper gateway interface, normally IP.
With bus access to KNX TP bus/line sniffing is possible giving details on the KNX network usage, also reading and writing commands to the bus would be possible (and even the configuration of the devices, if programming mode can be activated).
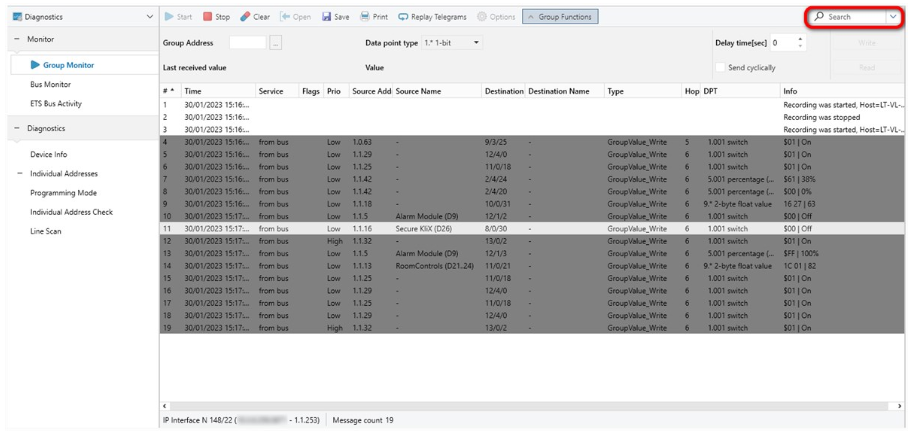
Figure 8: Example of KNX line sniffing.
KNX documentation: Bus Monitor, Group Monitor and ETS Bus Activity Monitor
A possible solution is using network segmentation and filtering in the bus to mitigate the impact (couplers as firewalls), even on the physical intrusion of a KNX network endpoint. Using KNX Secure on supported devices may protect them from some attacks.
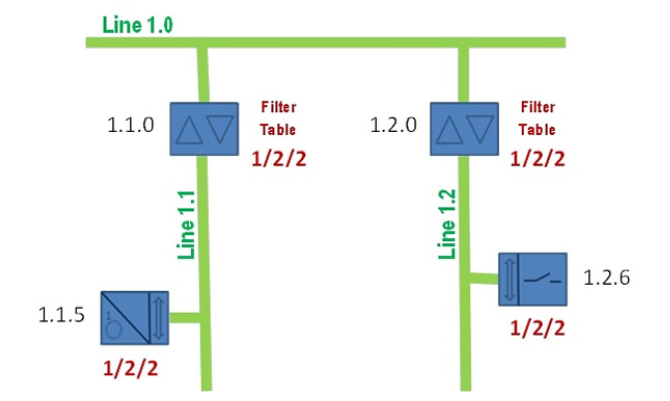
Figure 9: Example of KNX segmentation by filtering on couplers.
KNXtoday: How to Solve It: Manually Adding Group Addresses to the Filter Table
Gateways and IP routers to KNX network must also be safe from intrusions having properly configured all accesses with complex passwords. KNX Secure can be used to secure the communication between the operator and gateway. Securing the devices from malicious configurations, KNX Secure can also be used to authenticate on the devices, but if not properly configured an attacker may set a password on it and the owner will be unable to update the configuration. One example of extreme impact was a story about a building ransomware where the owner got locked out of their own KNX devices by the attacker, leaving the KNX devices useless. This could have a tremendous impact if not rescued by the security team with all the devices that would otherwise be changed.
KNX Secure
KNX Secure is implemented as KNX Data Security and KNXnet/IP Security. Both use AES-CCM (AES-CTR-128 + AES-CBC-MAC-128) to ensure data integrity (prevents the tampering of data), confidentiality (encryption of data), and prevents replay attacks through sequence numbers.
KNX Data Security is done on the communication of the KNX bus. Enables to authenticate and encrypt telegrams to devices (which must support KNX Data Security and be properly configured).
For KNX Data Security support there are 4 types of keys:
- Factory default
-
-
- Factory default key, reactivated on factory reset
- non-readable/non-writable
-
- Tool key
-
-
- Replaces Factory default key
- Writable only
-
- P2P keys
-
-
- P2P communication
- Readable/Writable
-
- Group keys
-
- Runtime communication
- Readable/Writable
For ensuring protection to replay attacks several sequence counters are used. There are 3 types of sequence counters of 48 bits long:
| Sending | One per device
Incremented on each sent message PID_SEQUENCE_NUMBER_SENDING |
| Receiving | One per device
Accept only higher values PID_SECURITY_INDIVIDUAL_ADDRESS_TABLE |
| Tool access | Accept only higher values
Non-readable/Non-writable |
KNX IP Security protects data in IP networks and also protects access to KNX networks. With multicast routing, communication uses a fixed key, a sequence counter time based, and a sync mechanism. Unicast communication uses individual keys per session using ECDH (Curve25519), device authentication codes, and user passwords.
KNX IP Security uses 2 types of keys:
- Factory default:
- Factory default key, reset on factory defaults
- Non-readable or writable
- On a QR code sticker on the device (or the key string)
- Tool key:
- Replace Factory default by ETS
- and is not visible to customers
KNX Audit tips
A common approach to audit a KNX installation would be to at least check the following items:
- Scan for EIBnet/IP gateways
-
-
- default port: 3671/udp
- nmap -sU -n -Pn -p3671 127.0.0.1
- multicast address discovery
- default port: 3671/udp
-
- Scan for EIBlib/IP gateways
-
-
- default ports: 50000/tcp, 50001/tcp, 50002/tcp
- default ports: 50000/tcp, 50001/tcp, 50002/tcp
-
- nmap -sS -n -Pn -p50000-50002 127.0.0.1
-
-
-
- Look for KNX RF / Zigbee / Bluetooth and other types of gateways to KNX buses and ways to get in the physical KNX bus.
- On bus access:
-
- group monitoring for understanding the network
-
-
-
- Is it a “flat” network? How could we improve?
-
-
- read/write command to the bus
-
-
-
- Turn on/off lights/heating/etc
- Send fake messages like date, time, temperature and other sensors information
-
-
- check the possibility of reading/writing device configurations and memory
-
-
- Remote activation of programming mode on devices
- disclosure of secrets
- usage permissions on memory blocks (read/write)
-
KNX Internet exposure
As of January 2023, the following could be found on shodan.io with a simple port:3671 query. More than 13k results are a lot of available KNX gateways. While not tested there may be a lot more than desired insecure accesses in that list.
As a good practice, these gateways should never be exposed on the public internet, but you can start using KNX Secure if supported. Never forget to properly configure all settings in the device. Testing it afterward could help find missing configurations.
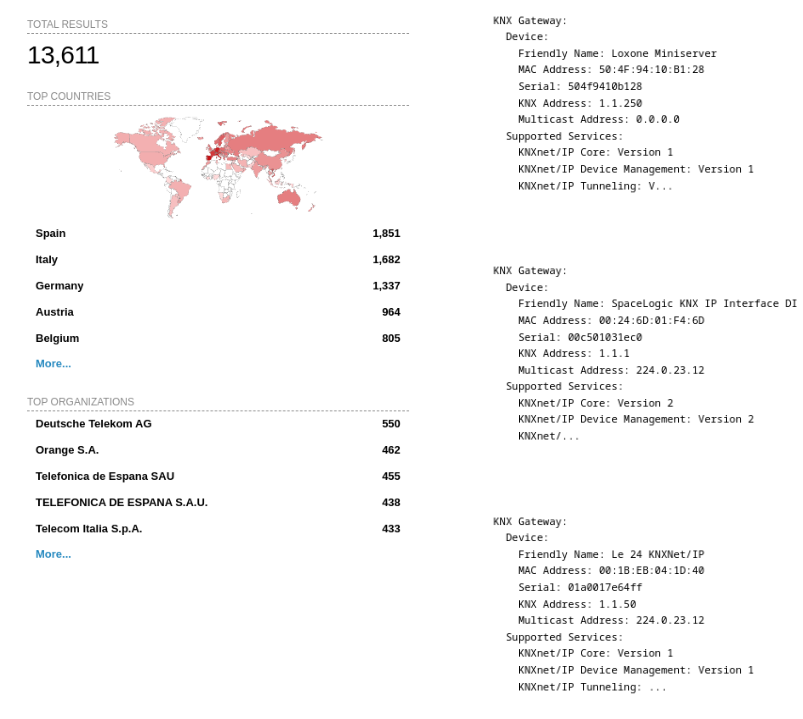
Figure 10: Internet exposure enumeration with shodan.io on January 2023.
shodan.io
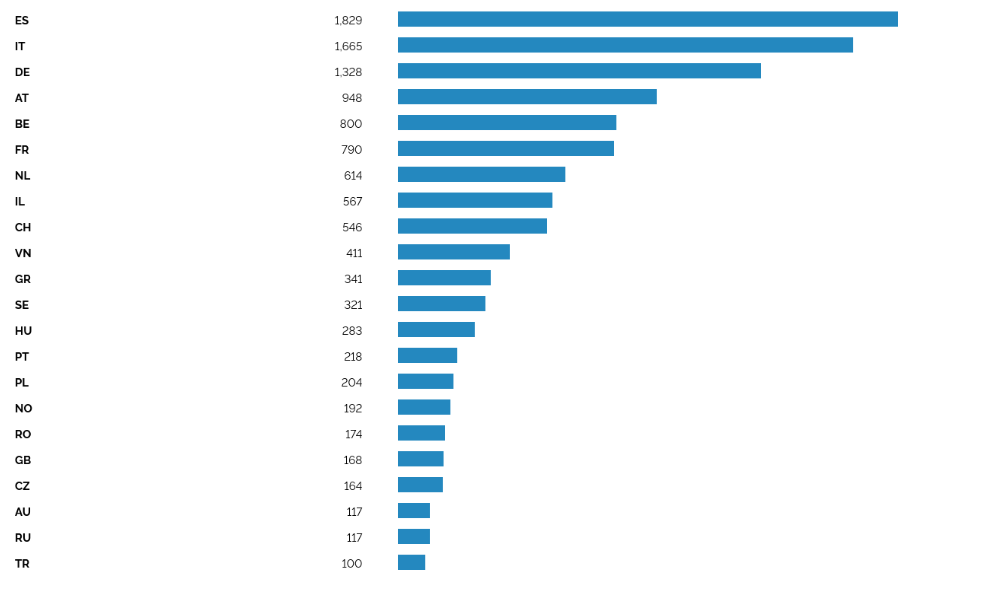
Figure 11: KNX Internet exposure by country on January 2023.
shodan.io
From these charts, we can see that there exists an exposure of these technologies in the public internet that can lead to disastrous consequences. Depending on the building and the attacker’s objectives, he can even plan physical intrusion strategies (turning on the heating and locking it, p.e., to see if anyone would open a window). Even the corruption of the current configuration on those devices could be an assle to solve. The best is always to take good preventive measures to stop attackers before they reach your KNX interface or bus.
Research paths
Each KNX device has its own firmware that can be extracted and updated. This by itself leaves room for inspection and or tampering. It may be possible to research on:
- the discovery of hidden features and bug hunting
- adding (malicious) features to a firmware
- a bypass for the programming button or KNX Secure
Check out our IOT Series blog posts on some similar topics for reversing the device software.
- IoT Series (I): Are People Ready to go?
- IoT Series (II): How to build kernel image from scratch
- IoT Series (III): Firmware testing in QEMU
- IoT Series (IV): Debugging with GDB & GHIDRA + Zero-day
There is not much information on attacks on KNX RF and this may be an easy way to get access to the KNX bus. There is also no readily available tool for auditing it.
In case of trouble, to restart a KNX TP network, only the KNX power supply unit must be turned off and on. All devices under that PSU will restart.
Final Thoughts
There are potential security risks that need to be addressed to ensure the safety and privacy of the users and their connected systems. Here are some of the security risks associated with KNX technology:
Unauthorized Access: If proper access controls and authentication mechanisms are not implemented, unauthorized users may gain access to the KNX network, potentially compromising the entire building automation system.
Man-in-the-Middle Attacks: In a man-in-the-middle attack, an attacker intercepts communication between KNX devices, allowing them to eavesdrop, modify, or inject malicious commands into the data flow, leading to unauthorized control or manipulation of devices.
Weak Encryption: Inadequate or weak encryption protocols can expose sensitive data exchanged between KNX devices, making it susceptible to interception and exploitation by attackers.
Denial of Service (DoS) Attacks: A DoS attack aims to overwhelm the KNX network with a flood of traffic or excessive requests, causing disruptions in communication and rendering the building automation system non-functional.
Firmware and Software Vulnerabilities: Exploitable vulnerabilities in KNX devices’ firmware or software can be targeted by attackers to gain unauthorized access or perform malicious actions.
Physical Attacks: Physical access to KNX devices can lead to tampering or direct manipulation of the devices, compromising the integrity of the building automation system.
Lack of Security Updates: Failure to apply security updates and patches to KNX devices and software can leave them vulnerable to known security vulnerabilities.
Insider Threats: Insider threats, either accidental or intentional, can pose security risks. Employees or individuals with legitimate access to the KNX system may misuse their privileges or inadvertently cause security breaches.
Insecure Network Configuration: Misconfigurations in the KNX network or improper network segmentation can lead to security gaps, allowing attackers to gain unauthorized access to critical devices.
Lack of Security Awareness: Insufficient awareness and training among users, administrators, and integrators about KNX security best practices can increase the risk of human error leading to security breaches.
In order to mitigate these risks, it is crucial to implement robust security measures, including:
- Strong authentication and access controls
- Encryption of communication channels
- Regular security audits and vulnerability assessments
- Timely application of security updates and patches
- Network segmentation to isolate critical devices
- Physical security measures to protect KNX devices
- Security awareness training for all stakeholders involved in the KNX deployment
By proactively addressing these security risks, users can enhance the overall security posture of their KNX-enabled building automation systems and reduce the likelihood of potential security incidents or data breaches.
We hope you enjoyed and learned a bit about KNX.
Happy hacking!
Reading references
References and specification
KNX RF
Frequency, Communication & Media Couplers – KNX Association
Security Issues
https://2015.zeronights.org/assets/files/20-Litvinov.pdf
(in)security in building automation – how to create dark buildings with light speed
https://limessecurity.com/en/knxlock/
Author
Hugo Trovão (Offensive specialist)